Course Builder
Using the course builder to design your courses
A course on the board – 20s, no narration
Course Builder Interface
A new course opens in the course builder as a simple list of steps. Click Add step to add a page, a lesson, a test or any other element, and drag the steps into the order learners should meet them. When the course needs different routes for different learners, choose Add branching: the list becomes a course map with the elements on the left, and you draw the connections between them. The rest of this guide describes the course map.
The Ask panel is available in both views. Describe what the course should cover and Ask Konstantly drafts the steps for you.
The Top Bar
The bar across the top of the course builder holds what applies to the whole course:
- Back to course: the arrow at the left takes you back to the course page.
- The course title: click it to rename the course.
- Build | Preview: Preview shows the course from the learner's side, starting from the first step.
- Theme: opens the course themes, where you choose or adjust the colours and fonts for the whole course.
- Publish: the one dark button. On a published course it becomes Update, and then Publish update when your changes are ready.
- ⋯: the less common actions, including switching between the simple list and branching.
A course can also take a prebuilt structure: choose Add from a template in the step list.
Course Map
Course map allows you to create "IF" links between the elements to create various paths to walk through the course. You can create menus, pass and fails paths after a test which will lead learners who have completed the test successfully to the congratulations page, and those who failed back to the lesson.
On the panel on the left side of the screen you see the list of elements. To start building your course simply drag and drop the elements from the left side to the map. Arrange them in the order you want learners to meet them, and set the connections between the elements.
Types of Connections
Course map allows you to build up a more flexible and entertaining course scenario.
Default Connection
Hold the blue arrow button on the element that you would like to make a connection from, without letting it off pull it to the connecting element or to the empty space on the map and choose the connecting element from the dropdown list.
In the player mode (when a learner plays the course) the default connection will be activated by pressing the arrow "next" in the right part of the screen, and a learner will be taken to the next element.
Click Transition
'Page' type of elements can also grow click transitions to forward learners to any other type of element in your course. Objects like text, image, shape or video situated on a page, can work as buttons in the player mode.
To create a click transition from an object on a page hold the black arrow button on the page that you would like to make a connection from, without letting it off pull it to the connecting element or to the empty space on the map and choose the connecting element from the dropdown list.
In the popup window you will see a screenshots of the "From" page and the "To" page. Here you need to choose the target object on the "From" page by clicking which the learner will be taken to the "To" page. Click "Create".
If needed, the transition can be deleted or edited.
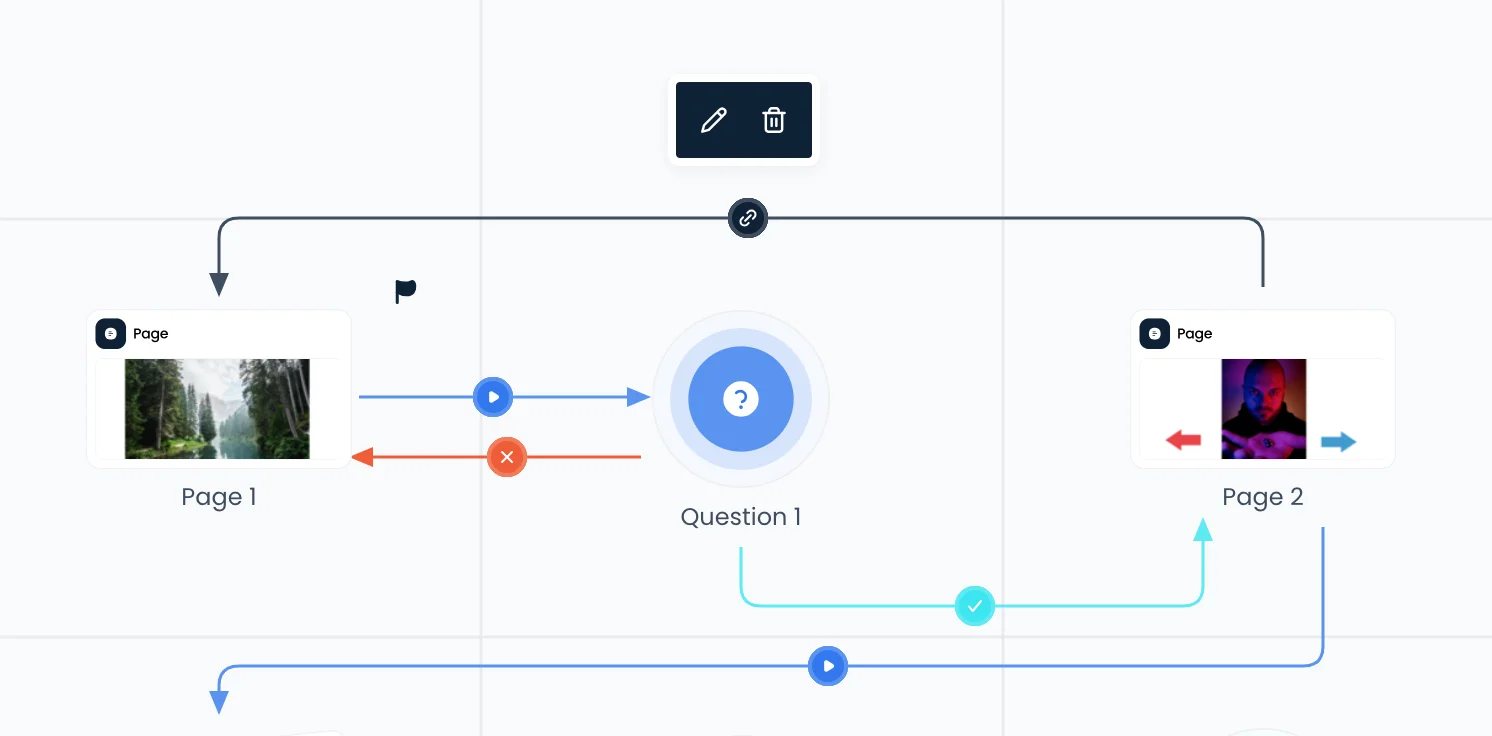
Simply click the button on the connection that needs to be changed and choose the "pencil" button for editing or the "trashcan" button for deleting.
Success and Fail Connections
Light Blue and Red arrows are responsible for sorting learners who failed/passed a Test or another assessment element and sending them different paths.
Blue and red arrows can only go from the assessment elements: Question, Test, Expert-graded assessment or a Peer-graded assessment.
When working with a Question element you will be required to set up a correct (one and only correct) answer to your question for our system to remember. A learner who gives this very answer will be taken the light blue way.
The learner who answered the question wrong or partly wrong will go to the element that is connected by the red-fail arrow.
For Tests that can contain more than one question, you need to set up a pass threshold – percentage of the correct answers in this test required to pass the test. If the threshold is reached, a learner goes the green path, if failed – the red.
Pass and fail connections work the same for Expert- and Peer-graded assessments. Except that here you can choose whether the mark should be given in the format "pass/fail" or "grade 1 - 100".